Drawing with Adobe Photoshop – Meaning and Uses to Adobe Photoshop Primary 6 (Basic 6) Term 1 Week 7 Information Technology (Computer Studies)
INFORMATION TECHNOLOGY (COMPUTER STUDIES)
BASIC SCIENCE AND TECHNOLOGY (BST)
FIRST TERM WEEK 7
PRIMARY 6 (BASIC 6)
THEME – DRAWING PACKAGES
PREVIOUS LESSON – Drawing with Computer CorelDraw | Components of CorelDraw Primary 6 (Basic 6) Term 1 Week 6 Information Technology (Computer Studies)
TOPIC – IDENTIFICATION OF DRAWING PACKAGES
LEARNING AREA
1. Introduction
2. Identification of Drawing Packages – Adobe Photoshop
3. Compoents of Adobe Photoshop Environment
4. Revision and Weekly Assessment (Test)
PERFORMANCE OBJECTIVES
By the end of the lesson, the pupils should have attained the following objectives (cognitive, affective and psychomotor) and should be able to –
1. identify computer drawing packages – adobe photoshop.
2. lists components of the adobe photoshop.
3. create, edite, and manipulate digital images and graphics.
ENTRY BEHAVIOUR
The pupils can identify and differentiate between real images and the edited images.
INSTRUCTIONAL MATERIALS
The teacher will teach the lesson with the aid of a functional computer system with adobe photoshop installed.
METHOD OF TEACHING
Choose a suitable and appropriate methods for the lessons.
Note – Irrespective of choosing methods of teaching, always introduce an activities that will arouse pupil’s interest or lead them to the lessons.
REFERENCE MATERIALS
1. Scheme of Work
2. 9 – Years Basic Education Curriculum
3. Course Book
4. All Relevant Material
5. Online Information
CONTENT OF THE LESSON
LESSON 1 – INTRODUCTION
Computer users draw, paint and design using various drawing packages. These packages are called graphic applications. Examples of graphical application packages are – Microsoft paint, Corel draw, Adobe photoshop, Graphic artist, Krita and Autocad.
MEANING OF ADOBE PHOTOSHOP
Adobe Photoshop is a computer program that helps people to edit and change pictures. You can use it to make photos look better, add colors, remove unwanted parts, or even create new drawings and designs.
Adobe Photoshop is like a digital art tool that lets you paint, draw, and fix photos on the computer — just like coloring and decorating in a picture book, but on a screen! In order words, Adobe Photoshop is like a magic art book on the computer where you can draw, color, fix, and decorate pictures in many creative ways.
USES OF ADOBE PHOTOSHOP
Adobe Photoshop is a computer program used to edit pictures and create designs. It helps people change how a photo looks, add colors, words, and shapes, or make new artwork.
1. It is used for editing photos.
2. It is used for drawing and painting.
3. It is used for designing posters, greeting cards, and flyers.
4. It is used for adding text on the pictures to make beautiful titles.
5. It is used for fixing old or damaged photos to make them look new.
Assignment – Draw and label Adobe Photoshop.
LESSON 2 – COMPONENTS OF ADOBE PHOTOSHOP ENVIRONMENT
The Photoshop environment means the main parts you see when you open Photoshop – where you work, draw, and edit pictures.
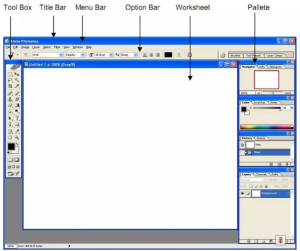
1. Menu Bar – It is at the top of the screen. It has commands like File, Edit, Image that helps you use to open, save, or edit pictures.
2. Toolbox (Tools Panel) – It is found on the left side. This is where you find drawing and editing tools like the Brush, Eraser, Paint Bucket, and Move Tool.
3. Options Bar – It appears below the Menu Bar and changes depending on the tool you are using. Example: If you choose the Brush tool, it shows brush size and color options.
4. Image Window (Canvas/Workspace) – This is the big white area in the middle where you draw or edit your picture. It’s like your drawing paper.
5. Layers Panel – It is found on the right side. Layers help you work on different parts of a picture separately — like stacking papers.
6. Color Panel – It is used to pick and change colors for painting or text. That’s, lets you choose and change colors for painting and drawing.
7. Navigator/Status Panel – It helps you move around and zoom in or out of your picture. That’s, it shows information about your work, like the size of the image or the zoom level.
In summar,
The Photoshop environment is like your digital art table —
the menu is your control buttons,
the tools are your art materials,
the canvas is your paper,
and the layers are your drawing sheets!
Assignment – Find out the basic steps for drawing with Adobe Photoshop.
LESSON 3 – BASIC DRAWING STEPS
Using Adobe Photoshop to draw is just like coloring and painting on your computer, you open a page, pick a brush, choose colors, draw your picture, and then save it.
Basic drawing steps using Adobe Photoshop are as follows –
1. Open Adobe Photoshop – Click on the Photoshop icon to start the program. Then, choose File → New to open a blank page (your drawing space).
2. Set Your Canvas Size – Pick how big you want your drawing to be (for example, A4 size). Also, choose background color (white or transparent).
3. Select a Drawing Tool – Go to the Toolbox and choose the Brush Tool or Pencil Tool to start drawing.
4. Pick a Color – Click the Color Picker to choose your favorite color.
5. Start Drawing – Use your mouse or stylus to draw shapes, lines, or pictures on the canvas.
6. Use Eraser or Undo Mistakes – If you make a mistake, use the Eraser Tool or press Ctrl + Z to undo.
7. Add More Colors and Details – Use different brush sizes, shapes, and colors to decorate your drawing.
8. Save Your Work – Click File → Save As, choose a name, and save your artwork as a picture (like .jpg or .png).
The above should be taught and demonstrate using functional computers.
Assignment – Find out the meaning of programming.
PRESENTATION
To deliver the lesson, the teacher adopts the following steps:
1. To introduce the lesson, the teacher revises the previous lesson. Based on this, he/she asks the pupils some questions;
2. Teacher organizes the pupils into two or more groups depending on the size of the class.
3. Teacher displays samples of two images (the original and the edited) for the children identify and differentiate between the two images.
Pupil’s Activities – The pupils identify and and differentiate between the two images.
4. Teacher supports and illustrates briefly how the image is edited using Adobe Photoshop.
5. Teacher uses images displayed and the pupils relevant responses to introduce the lesson and explain the meaning and uses of Adobe Photoshop.
Pupil’s Activities – The pupils pay attention to the lesson introduction, understand the meaning and the uses of Adobe Photoshop.
6. Teacher opens Adobe Photoshop to explain, lead and guide the pupils to work with the tools and its environment.
Pupil’s Activities – The pupils listen attentively, understand and work with the Adobe Photoshop tools and its environment.
7. Teacher organizes a practical class for the pupils to draw/edit and color images or objects using Adobe Photoshop.
Pupil’s Activities – The pupils participate actively in the practical class.
8. Teacher summarizes the lesson on the board with appropriate evaluation.
Pupil’s Activities – The pupils participate actively in the summary of the lesson by responding correctly to most of the questions write as instructed.
CONCLUSION
To conclude the lesson for the week, the teacher revises the entire lesson and links it to the following week’s lesson.
Next Lesson –
LESSON EVALUATION
Teacher asks the pupils to:
1. explain the meaning of Adobe Photoshop.
2. state 5 uses of Adobe Photoshop.
3. describe 5 Adobe Photoshop environment.
4. draw and label Adobe Photoshop environment.
5. identify label each part of Adobe Photoshop environment below.

WORKBOOK
INSTRUCTION – Choose the correct answer from the options A – D.
LESSON 1 – MEANING AND USES ADOBE PHOTOSHOP
1. _____ draw, paint and design using various drawing packages.
A. Computer applications
B. Computer users
C. Computer viruse
D. Computer programming
2. _____ is a computer program that helps people to edit and change pictures.
A. CorelDraw
B. Adobe Photoshop
C. Microsoft Paint
D. Microsoft Word
3. Adobe Photoshop is like a _____ that lets you paint, draw, and fix photos on the computer.
A. computer art tool
B. digital art tool
C. digital excel tool
D. computer digital tool
4. Adobe Photoshop is like a _____ on the computer where you can draw, color, fix, and decorate pictures in many creative ways.
A. computer art book
B. adobe art book
C. magic art book
D. photoshop art book
5. One of these is not the uses of Adobe Photoshop.
A. It is used for editing photos.
B. It is used for drawing and painting.
C. It is used for designing posters, greeting cards, and flyers.
D. It is used for taking pictures.
6. The following are not the uses of Adobe Photoshop except _____.
A. It is used for taking pictures.
B. It is used for deleting photos.
C. It is used editing photos.
D. It is used opening photos application.
LESSON 2 – ADOBE PHOTOSHOP ENVIRONMENT
7. _____ helps you use to open, save, or edit pictures.
A. Menu bar
B. Toolbox
C. Canvas
D. Options bar
8. _____ is where you find drawing and editing tools like the Brush, Eraser, Paint Bucket, and Move Tool.
A. Options bar
B. Toolbox
C. Canvas
D. Menu bar
9. _____ appears below the Menu Bar and changes depending on the tool you are using.
A. Options bar
B. Toolbox
C. Canvas
D. Menu bar
10. The big white area in the middle where you draw or edit your picture is called _____.
A. Menu bar
B. Toolbox
C. Canvas
D. Options bar
11. _____ help you work on different parts of a picture separately – like stacking papers.
A. Layers panel
B. Control panel
C. Screen panel
D. Drawing panel
12. Color Panel is used to pick and change colors for _____.
A. painting
B. text
C. all of the above
D. none of the above
13. Status Panel helps you move around and _____ of your picture.
A. zoom in
B. zoom out
C. move out
D. move in
LESSON 3 – BASIC DRAWING STEPS USING ADOBE PHOTOSHOP
14. Arrange the following in order – first to last steps.
I. Select a Drawing Tool
II. Add More Colors and Details
III. Save Your Work
IV. Pick a Color
V. Open Adobe Photoshop
VI. Set Your Canvas Size
VII. Start Drawing –
VIII. Use Eraser or Undo Mistakes
15. Label each part of the diagram below.

Second Term Examination English Studies Primary 5 (Basic 5)
Exam Questions – First Term, Second Term and Third Term Examination Primary 6 (Basic 6) – All Primary 6 Subjects

Things We Must Be Do As Children Of God (The Story of The 10 Lepers) Primary 1 (Basic 1) Term 2 Week 2 Christian Religious Studies (CRS)
About The Author
Alabi M. S.
Michael is Principal Education Officer at LASUBEB. With 15+ years experience in teaching and learning, He loves talking about Plan Lesson Notes and Quality Assurance in Education. He also believes teachers inspire our future. CRN (ClassRoomNotes) is a website FOR TEACHERS BY TEACHER, and He aims to continuously inform and encourage teaching! All materials are subject to TERMLY review.