Drawing with Computer Microsoft Paint | Components of Microsoft Paint Environment Primary 6 (Basic 6) Term 1 Week 5 Information Technology (Computer Studies)
INFORMATION TECHNOLOGY (COMPUTER STUDIES)
BASIC SCIENCE AND TECHNOLOGY (BST)
FIRST TERM WEEK 5
PRIMARY 6 (BASIC 6)
THEME – MICROSOFT PAINT
PREVIOUS LESSON – Drawing with Computer – Identification of Drawing Packages Primary 6 (Basic 6) Term 1 Week 4 Information Technology (Computer Studies)
TOPIC – IDENTIFICATION OF DRAWING PACKAGES
LEARNING AREA
1. Introduction
2. Identification of Drawing Packages – Microsoft Paint
3. Compoents of Microsoft Paint Environment
4. Revision and Weekly Assessment (Test)
PERFORMANCE OBJECTIVES
By the end of the lesson, the pupils should have attained the following objectives (cognitive, affective and psychomotor) and should be able to –
1. meaning to Microsoft Paint.
2. lists components of the paint environment.
ENTRY BEHAVIOUR
The pupils can identify and differentiate drawing with computer from freehand drawing.
INSTRUCTIONAL MATERIALS
The teacher will teach the lesson with the aid of a functional computer system with Paint Artist software (or Corel Draw) installed.
METHOD OF TEACHING
Choose a suitable and appropriate methods for the lessons.
Note – Irrespective of choosing methods of teaching, always introduce an activities that will arouse pupil’s interest or lead them to the lessons.
REFERENCE MATERIALS
1. Scheme of Work
2. 9 – Years Basic Education Curriculum
3. Course Book
4. All Relevant Material
5. Online Information
CONTENT OF THE LESSON
LESSON 1 – INTRODUCTION
Microsoft Paint is a simple graphics editor that has been included in all versions of Microsoft Windows. The program opens and saves files in Windows bitmap (BMP), GIF, PNEG,JPEG and single-page TIFF formats. MS paint is the basic tool that is present in every Windows software.
MS Paint is used to colour, draw and edit pictures. This program can be in colour mode or in black and white mode. It became popular among the early Windows users as it allowed them to paint on computers. Let’s learn more about it ahead!
DRAWING PACKAGES
Computer users draw, paint and design using various drawing packages. These packages are called graphical applications. Examples of graphical application packages are –
1. Microsoft Paint
2. Corel draw
3. Adobe photoshop
4. Graphic Artist
5. Krita
6. Autocad
LESSON 2 – DRAWING WITH MICROSOFT PAINT
Microsoft Paint, also known as Paint, is a simple program that allows users to create basic graphic art on a computer. To draw with Microsoft Paint, open the application by clicking the Start menu, then Windows Accessories, and selecting MS Paint.
OPENING MS PAINT
1. Click the Start menu or the Windows icon in the bottom-left corner of your screen.
2. Scroll down to “Windows Accessories”, in the list of apps.
3. Select MS Paint to open the drawing program.
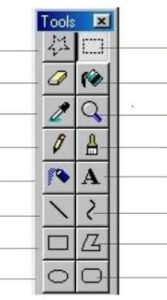
BASIC DRAWING TOOLS
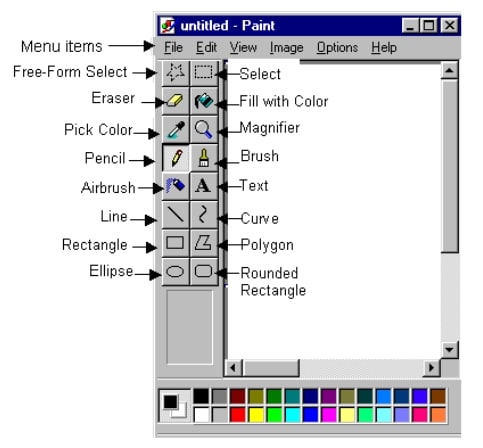
1. Free-Form Select – It is known as Irregular Select Tool. Free-Form Select is used to select objects that have been drawn in the drawing area. The tool can Cut, Copy, or Paste.
2. Select – It is also known as Rectangle Select tool or Regular Select. Tool. Select tool is used to select objects in the drawing area. The tool can Cut, Copy, or Paste.
3. Eraser – This tool is used to remove mistakes that have been made in a drawing. The size of the eraser can be adjusted to remove parts of the drawing.
4. Fill Color – It is also known as the Paint Bucket Tool. Fill Color is used to fill closed areas with any colour of your choice.
5. Pick Colour – Pick Colour is used to pick or select a colour from pictures.
6. Magnifier – Magnifier is used to make drawing objects to appear bigger or smaller.
7. Pencil – It is a default tool in the paint program. Pencil tool is a tool that allows a freehand drawing.
8. Brush – Brush allows for different brush styles and sizes.
9. Airbrush – It is known as as spray paint tool. Airbrush tool allows you to spray the object with the colour.
10. Text – Text is used for adding text to your drawings.
11. Line – The line tool is used to draw lines such as horizontal, vertical and diagonal lines.
12. Rectangular – Rectangular tool is used to draw rectangles and squares of different sizes.
13. Curve – Curve tool is used to draw lines and curves.
14. Polygon – Polygon is used to draw closed shapes with many straight sides by placing points and connecting them with lines. It can also be used to draw shapes such as a triangle, star, rhombus and many other polygons.
15. Ellipse – The ellipse tool allows you to draw circles and ovals
16. Rounded Rectangle – Rounded Rectangle is used for drawing rectangles and squares of different sizes with rounded edges.
LESSON 3 – DRAWING WITH MICROSOFT PAINT (PRACTICAL)
OPENING MS PAINT
1. Click the Start menu or the Windows icon in the bottom-left corner of your screen.
2. Scroll down to “Windows Accessories”, in the list of apps.
3. Select MS Paint to open the drawing program.
BASIC DRAWING STEPS
1. Sketch – Use the Pencil tool to sketch the main lines of your drawing.
2. Color Base – Select a color and use the Fill tool to add your base colors.
3. Add Details – Use the Brush tool for more detailed work, and the Eraser to correct any mistakes.
4. Add Highlights and Shadows – Use lighter and darker shades of your base colors with the Brush or Fill tool to create depth.
PRESENTATION
To deliver the lesson, the teacher adopts the following steps:
1. To introduce the lesson, the teacher revises the previous lesson by asking relevant questions based on what has been taught or learnt.
2. Teacher organizes the pupils into two or more groups depending on the size of the class.
3. Teacher asks the pupils to draw and color any shape of their choice.
4. Teacher lets the pupils know that each shape or object drawn can also be drawn and colored using computer.
5. Teacher uses the pupil’s drawing and stated facts to introduce the lesson and explain the concept of drawing with computer.
Pupil’s Activities – The pupils pay attention to the lesson introduction and understand the concept of drawing with computer.
6. Teacher opens Microsoft Paint to explain, lead and guide the pupils work with the Ms Paint tools and environment.
Pupil’s Activities – The pupils listen attentively, understand and work with the Ms Paint tools and environment.
7. Teacher organizes a practical class for the pupils to draw and color shapes or objects.
Pupil’s Activities – The pupils participate actively in the practical class.
8. Teacher summarizes the lesson on the board with appropriate evaluation.
Pupil’s Activities – The pupils participate actively in the summary of the lesson by responding correctly to most of the questions write as instructed.
CONCLUSION
To conclude the lesson for the week, the teacher revises the entire lesson and links it to the following week’s lesson.
Next Lesson – Microsoft Paint Environment (Primary 6)
LESSON EVALUATION
Teacher asks the pupils to,
1. explain the Microsoft Paint Environment.
2. state 10 features of Microsoft Paint Environment.
3. identify the following:
WEEKLY ASSESSMENT
INSTRUCTION – Choose the correct answer from the options A – D.
1. ______ is a simple program that allows users to create basic graphic art on a computer.
A. Microsoft Word
B. Microsoft Paint
C. Microsoft Excel
D. Microsoft Power
2. To draw with Microsoft Paint, open the application by clicking the Start menu, then Windows Accessories, and selecting ______.
A. MS Paint
B. Microsoft Paint
C. All of the above
D. None of the above
3. ______ is used to select objects that have been drawn in the drawing area.
A. Eraser
B. Select
C. Brush
D. Free-Form Select
4. ______ tool is used to select objects in the drawing area.
A. Free-Form Select
B. Brush
C. Color
D. Select
5. ______ is used to remove mistakes that have been made in a drawing.
A. Eraser
B. Select
C. Brush
D. Free-Form Select
6. ______ is also known as the Paint Bucket Tool.
A. Eraser
B. Select
C. Brush
D. Free-Form Select
7. ______ is used to fill closed areas with any colour of your choice.
A. Fill color
B. Eraser
C. Select
D. Brush
8. ______ is used to pick or select a colour from pictures.
A. Pick color
B. Airbrush
C. Pencil
D. Brush
9. ______ is used to make drawing objects to appear bigger or smaller.
A. Magnifer
B. Magnet
C. Eraser
D. Select
10. ______ tool is a tool that allows a freehand drawing.
A. Brush
B. Pencil
C. Airbrush
D. Pick color
11. ______ allows for different brush styles and sizes.
A. Pick color
B. Airbrush
C. Pencil
D. Brush
12. ______ is known as as spray paint tool.
A. Brush
B. Pencil
C. Airbrush
D. Pick color
13. ______ tool allows you to spray the object with the colour.
A. Brush
B. Pencil
C. Airbrush
D. Pick color
14. ______ is used for adding text to your drawings.
A. Text
B. Number
C. Pencil
D. Eraser
15. ______ tool is used to draw lines such as horizontal, vertical and diagonal lines.
A. Bend
B. Curve
C. Line
D. Lane
16. ______ tool is used to draw rectangles and squares of different sizes.
A. Square
B. Rectangular
C. Circle
D. Polygon
17. ______ tool is used to draw lines and curves.
A. Curve
B. Shape
C. Ellipse
D. Line
18. ______ is used to draw closed shapes with many straight sides by placing points and connecting them with lines.
A. Square
B. Rectangle
C. Circle
D. Polygon
19. ______ allows you to draw circles and ovals.
A. Curve
B. Shape
C. Ellipse
D. Line
20. ______ is used for drawing rectangles and squares of different sizes with rounded edges.
A. Rounded rectangle
B. Rounded square
C. Rounded triangle
D. Rounded polygon
Physical Fitness – Measuring Physical Fitness Components (Primary 6)
Distribution of Crops in Nigeria Primary 6

Writing of Alphabet for Lower Primary Schools – English Studies
About The Author
Alabi M. S.
Michael is Principal Education Officer at LASUBEB. With 15+ years experience in teaching and learning, He loves talking about Plan Lesson Notes and Quality Assurance in Education. He also believes teachers inspire our future. CRN (ClassRoomNotes) is a website FOR TEACHERS BY TEACHER, and He aims to continuously inform and encourage teaching! All materials are subject to TERMLY review.