Meaning and Types of Lines, Angles and Bearing Primary 5 – Term 3 Week 2 and Primary 6 Term 3 Week 3 Mathematics
MATHEMATICS
THIRD TERM
PRIMARY 5 – WEEK 2
PRIMARY 6 – WEEK 3
THEME – MENSURATION AND GEOMETRY
PREVIOUS LESSON – Temperature and Its Standard Units | Conversion between Celsius and Fahrenheit Primary 5 (Basic 5) Term 3 Week 1 Mathematics
TOPIC – LINES, ANGLES AND BEARINGS
LEARNING AREA
1. Introduction
2. Meaning and Types of Lines
3. Meaning and Types of Angles
4. Bearing and Cardinal Points
5. Lesson Evaluation and Weekly Assessment (Test)
LEARNING OBJECTIVES
By the end of the lesson, most pupils should have attained the following objectives –
1. identify parallel and perpendicular lines.
2. measure and draw angles, using the protractor.
3. identify complementary and supplementary angles.
4. tell direction accurately, using angles.
ENTRY BEHAVIOUR
The pupils can differentiate between a thin and a think lines.
INSTRUCTIONAL MATERIALS
The teacher will teach the lesson with the aid of chart showing cardinal points, different types of lines and angles, etc.
METHOD OF TEACHING
Choose a suitable and appropriate methods for the lessons.
Note – Irrespective of choosing methods of teaching, always introduce an activities that will arouse pupil’s interest or lead them to the lessons.
REFERENCE MATERIALS
1. Scheme of Work
2. 9 – Years Basic Education Curriculum
3. Course Book
4. All Relevant Material
5. Online Information
CONTENT OF THE LESSON
LESSON 1 – INTRODUCTION
ACTIVITY 1 – MEANING OF LINES
A line is a straight or curved mark made by marking materials like pen, pencil, etc.
A line can be thin or thick line. When two or more lines are combined, a shape, image or sign is formed.
Line is one of the important elements of design.
ACTIVITY 2 – TYPES OF LINES
1. Vertical lines
2. Horizontal lines
3. Diagonal lines
4. Zigzag lines
5. Curved lines
6. Dotted lines
7. Dash lines
8. Parallel line
9. Perpendicular line
10. Transversal line
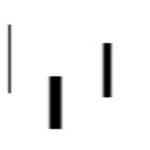
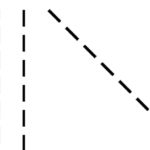
1. VERTICAL LINES
Vertical lines are straight lines that move up and down without any slant.
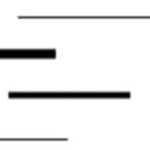
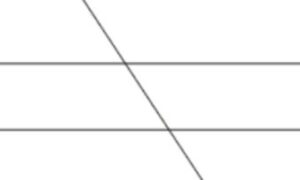
2. HORIZONTAL LINES
Horizontal lines are straight lines that are parallel to the horizon.
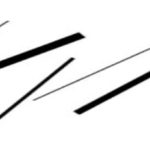
3. DIAGONAL LINES
Diagonal lines are straight thin or thick lines that slant.
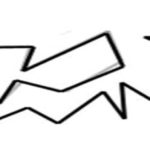
4. ZIGZAG LINES
Zigzag lines are straight thin or thick lines made from a combination of diagonal lines.
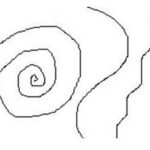
5. CURVED LINES
Curved lines are thin or thick lines that change direction gradually.
6. DOTTED LINES
Dotted lines are lines made up of a series of dots.
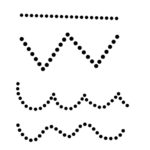
7. DASH LINES
Dotted lines are lines made up of a series of dots.
8. PARALLEL LINES
Parallel lines are lines in a plane that are always the same distance apart like equal sign.
______________________
______________________
9. PERPENDICULAR LINES
Perpendicular lines are lines that intersect at right angles.

10. TRANSVERSAL LINES
Transversal line are lines that intersect two straight lines at distinct points.
ACTIVITY 3 – USES/IMPORTANCE OF LINES
The uses of lines are as follows:
1. It is used to indicate a part.
2. It is used show direction.
3. It is used as a symbol.
4. It is used as a plan.
5. It is used to make a sketch.
6. It is used to mark out.
7. It is used to cut out a part.
8. It is used as measurement.
CLASS EXERCISE
1. Explain the meaning of lines.
2. state and draw types of lines.
3. differentiate between parallel and perpendicular lines.
4. what I’d the different between vertical and horizontal lines.
5. state 5 uses of lines.
LESSON 2 – ANGLES
ACTIVITY 1 – GROUP WORK
Materials Needed – Plain sheet of papers, rulers and pencil.
Teacher organizes pupils in groups or pairs depending on the size of the class to carry out the following instructions,
- Draw a straight line.
- Draw another straight line from the starting or end point of the first line.


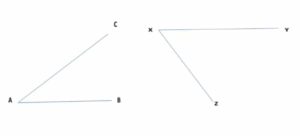
CONCEPT OF ANGLE
An angle is the space between two intersecting lines.
ACTIVITY 2 – GROUP WORK
Materials Needed – Plain sheet of papers, protractors, rulers, pencil chart showing different types of angles such as
Teacher uses the existing groups or pairs and guides them to measure and record correctly each of the above angle.
Record,
1.
2.
3.
4.
5.
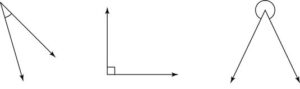
ACTIVITY 3 – TYPES OF ANGLES
An angle is the space between two intersecting lines.
There are different types of angles,
1. Right angle
2. Acute angle
3. Obtuse angle
4. Straight angle or angle on a straight line
5. Reflex angle
6. Angle on a point
7. Complimentary angle
8. Supplementary angle
1. RIGHT ANGLE
Right angle is the angle that forms a square corner.
It is an angle that is always equal 90°.
2. ACUTE ANGLE
Acute angle is any angle that less than 90°.
It is an angle between 1° – 90°.
Acute angle is greater 0° and less than 90°.
3. OBTUSE ANGLE
Obtuse angle is any angle that is larger (bigger) than right angle.
It is an angle between 91° – 179°.
Obtuse is greater than greater 90° and less than 180°.
4. STRAIGHT ANGLE
Straight angle is any angle that is equal to 180°.
It is twice of right angles.
Straight angle is equal to 180°.
5. REFLEX ANGLE
Reflex angle is any angle that is greater than 180° and less than 360°.
6. ANGLE AT A POINT
Angel at a point is any angle that is equal to 360°.
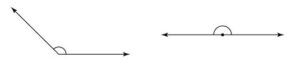
7. COMPLIMENTARY ANGLES
Complimentary angles are two angles that are sum up to 90º.
Two angles are said be complimentary angles, when they add up to 90°.
8. SUPPLEMENTARY ANGLE
Supplementary angles are two angles that are sum up to 180º.
Two angles are said be supplementary angles, when they add up to 180°.
LESSON 3 – BEARING AND CARDINAL POINTS
ACTIVITY 1 – OUTDOOR ACTIVITIES
Teacher’s activities,
- regroups the pupils or maintains the existing groups or pairs.
- marks the primary and secondary cardinal points on the field.
- lets 8 of the pupils represent the primary and secondary cardinal points.
- guides the groups or pair to locate some of the things or objects such as car, trees, flowers, stones, drainage, other buildings inside and outside school, animals, etc. starting from north position.
Pupil’s Activities – Identify living and non living within and around the school with their locations or directions.
ACTIVITY 2 – CARDINAL POINTS
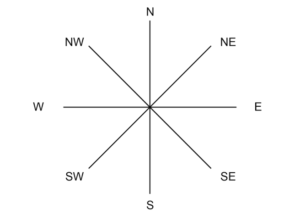
Bearing is the direction along which someone or something moves or faces.
It is used to describe or determine the position of someone or something.
Sometimes, it is used as right , left, forward (up) or backward (down).
Geographically, North, South, East and West are used in describing bearing.
These positions are known as cardinal points.
North, East, West and South are called primary points or positions while North East (NE), North West (NW), South East (SE) and South West (SW).
ACTIVITY 3 – CLASSROOM ACTIVITIES
Teacher marks the four all walls of the classroom as the North, East, South and West and lets pupils find the location of,
- all the doors, if there are more than one door.
- all bulbs, if there are more than one bulb.
- all the windows, if there are more than one wind.
- all the pupils are front, back, right, left and in between.
LESSON 4 – ANGLES AND CARDINAL POINTS
ACTIVITY 1 – ANGLES ON CARDINAL POINTS
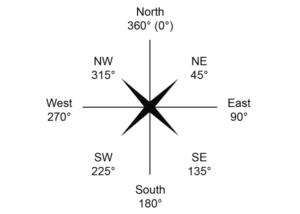
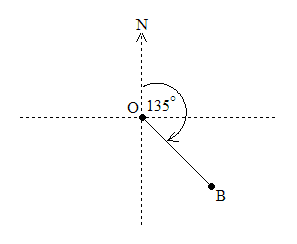
The primary cardinal directions are North (0°), East (90°), South (180°) and West (270°) at 90° angles on the compass rose.
The secondary cardinal directions are formed by bisecting the primary cardinal directions to give North East (45°), South East (135°) and South West (225°), North West (315°).
WORKING EXAMPLES
Find the location of the following angles,
1. 60°
2. 390°
3. 80°
4. 120°
SOLUTIONS
1. NE
2. NE (390° – 360° = 30°)
3. NE
4. SE
WORKING EXERCISE 1
Find the location of the following angles,
1. 100°
2. 200°
3. 250°
4. 270°
5. 300°
6. 390°
7. 450°
8. 480°
9. 540°
10. 359°
ACTIVITY 2 – WORKING EXERCISE 2
Draw and mark the following locations on cardinal points,
1. 135°
2. 200°
3. 250°
4. 270°
5. 300°
6. 100°
LESSON 5 – WORKING EXERCISE
WORKING EXERCISE 1
Give the complement of each of the following angles.
1. 51º
2. 13º
3. 46º
4. 65º
5. 53º
WORKING EXERCISE 2
Mention the supplement of each of the following angles.
1. 77º
2. 53
3. 67º
4. 32º
5. 48º
WORKING EXERCISE 3
Indicate it the sum is complementary or supplementary angles,
1. 114º + 66º =
2. 39º + 141º =
3. 68º + 22º =
4. 63º + 27º =
5. 94º + 86º =
6. 123º + 57º =
7. 41º + 49º =
8. 19º + 71º =
WORKING EXERCISE 4
Measure the following angles,
PRESENTATION
To deliver the lesson, the teacher adopts the following steps:
1. To introduce the lesson, the teacher revises the previous lesson. Based on this, he/she asks the pupils some questions;
2. Teacher organizes the pupils in groups or pair depending on the size of the class.
3. Teacher displays chart showing different types of lines.
4. Teacher asks pupils to compare and different between the lines.
Pupil’s Activities – Compare and identify different between the lines.
5. Teacher listens to the pupils and uses their responses to the introduce the lesson.
Pupil’s Activities – Pay attention to the lesson introduction to understand the concept of the lesson.
6. Teacher leads a discussion on the meaning, types and uses of lines.
7. Teacher guides pupils draw lines to form angels.
Pupil’s Activities – Use lines for form angles.
8. Teacher uses the pupils drawings to discuss the meaning and types of angles with appropriate examples from pupil’s drawings.
9. Teacher guides pupils to differentiate between the types of angles using appropriate examples.
Pupil’s Activities – Identify and describe each type of angle.
10. Teacher leads a outdoor activities to introduce and discuss the concepts of bearing and to locate living and non things around.
11. Teacher continues the bearing activities in the classroom to find the location of different things in the class.
Pupil’s Activities – Participate actively in the outdoor and indoor activities on bearing.
12. Teacher guides pupils to find the location of some angles using the cardinal points and to draw and indicate angles on the cardinal points.
Pupil’s Activities – Find the location of some angles using the cardinal points and to draw and indicate angles on the cardinal points.
13. Teacher leads a working exercises on measuring angles, supplementary and complimentary angles.
Pupil’s Activities – Participate actively in the working exercises.
14. Teacher summarizes each of the lesson on the board with appropriate evaluation.
Pupil’s Activities – Participate actively in the summary of the lesson by responding correctly in the questions and write as instructed.
CONCLUSION
To conclude the lesson for the week, the teacher revises the entire lesson and links it to the following week’s lesson.
NEXT LESSON
LESSON EVALUATION
Teacher asks pupils to,
1. identify parallel and perpendicular lines.
2. measure and draw angles, using the protractor.
3. identify complementary and supplementary angles.
4. tell direction accurately, using angles.
Differentiate between Words in each Pairs (Primary 2)

Meaning, Identification, Classification and State of Matter JSS 1 (Basic 7)

Third Term Examination Civic Education Primary 3 (Basic 3) – Exam Questions
About The Author
Alabi M. S.
Michael is a Principal Education Officer at LASUBEB with over 15 years of experience in teaching and learning. He is passionate about developing plan lesson notes and promoting quality assurance in education. Michael strongly believes that teachers inspire the future and play a vital role in shaping the next generation.