Simple Machines (Lever): Meaning and Examples of Simple Machines, Meaning and Types of Levers, Parts of a Lever and Uses of Levers Primary 6 (Basic 6) Third Term Week 2 Basic Science and Technology
SIMPLE MACHINES (LEVERS): MEANING AND EXAMPLES OF SIMPLE MACHINES, MEANING AND TYPES OF LEVERS, PARTS OF A LEVER AND USES OF LEVERS PRIMARY 6 (BASIC 6) THIRD TERM WEEK 2 BASIC SCIENCE AND TECHNOLOGY
BASIC SCIENCE AND TECHNOLOGY
THIRD TERM
WEEK 2
PRIMARY 6 (BASIC 6)
THEME – YOU AND TECHNOLOGY
TOPIC – SIMPLE MACHINES (LEVER)
LEARNING AREA
1. Introduction
2. Meaning and Examples of Simple Machines
3. Meaning and Types of Levers
4. Parts of a Lever and Uses of Levers
5. Weekly Assessment: Test Questions and Answers/Assignment
6. Summary
LEARNING OBJECTIVES
By the end of the lesson, pupils should be able to:
1. Define a simple machine.
2. Identify examples of simple machines.
3. Explain the meaning of a lever.
4. State the three types of levers.
5. Identify the parts of a lever.
6. State the uses of levers in everyday life.
ENTRY BEHAVIOUR
Pupils have previously learned about tools and their uses in carrying out different tasks. They know that tools help people work more easily and quickly.
This lesson builds on that knowledge by introducing simple machines, especially levers, which are special tools that make work easier by reducing the effort needed to lift, move, or cut objects.
INSTRUCTIONAL MATERIALS
The teacher will teach the lesson with the aid of:
1. Wheelbarrow
2. Scissors
3. Hammer
4. Bottle opener
5. Pliers
6. Crowbar
7. Nutcracker
8. Broom
9. Charts showing simple machines and types of levers
10. Textbooks
METHOD OF TEACHING
Choose a suitable and appropriate methods for the lessons.
Note – Irrespective of choosing methods of teaching, always introduce an activities that will arouse pupil’s interest or lead them to the lessons.
REFERENCE MATERIALS
1. Scheme of Work
2. 9 – Years Basic Education Curriculum
3. Course Book
4. All Relevant Material
5. Online Information
CONTENT OF THE LESSON
INTRODUCTION
Every day, we use tools such as scissors, wheelbarrows, bottle openers, crowbars, and hammers to make our work easier. These tools help us lift heavy loads, cut materials, open containers, and perform many other tasks with less effort.
Many of these tools are called simple machines because they help us do work more easily. One of the most common simple machines is the lever, which allows us to lift, move, or cut objects by applying less effort.
In this lesson, pupils will learn the meaning of simple machines, examples of simple machines, the meaning and types of levers, the parts of a lever, and the uses of levers in everyday life.
MEANING OF SIMPLE MACHINES
A simple machine is a basic tool that makes work easier. It helps people do work by reducing the amount of effort needed to lift, move, cut, or carry objects.
Simple machines do not reduce the amount of work done, but they make the work easier and faster.
EXAMPLES OF SIMPLE MACHINES
There are six basic simple machines:
1. Lever – Used for lifting or moving heavy objects.
- Examples: Crowbar, bottle opener, wheelbarrow, scissors.
2. Wheel and Axle – Helps objects move easily.
- Examples: Bicycle wheel, door knob, steering wheel.
3. Pulley – Used to lift heavy loads.
- Examples: Flagpole pulley, well pulley, crane.
4. Inclined Plane – A sloping surface that makes lifting easier.
- Examples: Ramp, staircase, slide.
5. Wedge – Used for cutting or splitting objects.
- Examples: Knife, axe, chisel.
6. Screw – Used for fastening objects together or lifting materials.
- Examples: Wood screw, jar lid, bolt.
IMPORTANCE OF SIMPLE MACHINES
1. They make work easier.
2. They reduce the effort needed to do work.
3. They save time.
4. They help people lift or move heavy objects.
5. They improve efficiency in homes, schools, farms, and industries.
MEANING OF A LEVER
A lever is a simple machine made up of a rigid bar that moves on a fixed point called the fulcrum. It is used to lift, move, or push heavy objects with less effort.
A lever makes work easier by increasing the force applied.
TYPES OF LEVERS
There are three types of levers.
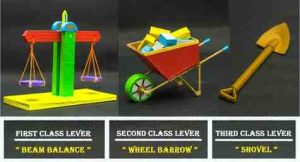
1. First-Class Lever
In a first-class lever, the fulcrum is between the effort and the load.
Examples:
- Seesaw
- Scissors
- Crowbar
- Pliers
2. Second-Class Lever
In a second-class lever, the load is between the fulcrum and the effort.
Examples:
- Wheelbarrow
- Nutcracker
- Bottle opener
3. Third-Class Lever
In a third-class lever, the effort is between the fulcrum and the load.
Examples:
- Broom
- Fishing rod
- Tweezers
- Human forearm
IMPORTANCE OF LEVERS
1. They make work easier.
2. They reduce the effort needed to lift heavy objects.
3. They help save time and energy.
4. They are used in many tools and machines.
A lever is a simple machine that helps us lift or move objects more easily. The three types of levers are:
- First-class lever – Fulcrum is in the middle.
- Second-class lever – Load is in the middle.
- Third-class lever – Effort is in the middle.
PARTS OF A LEVER
A lever has three main parts:
1. Fulcrum – The fixed point on which the lever turns or pivots.
2. Load – The object or weight that is lifted or moved.
3. Effort – The force applied to move or lift the load.
SIMPLE EXPLANATION OF THE PARTS
1. Fulcrum: Acts as the support or pivot of the lever.
2. Load: The heavy object that needs to be lifted, moved, or pushed.
3. Effort: The force provided by a person or machine to move the load.
Examples
1. In a wheelbarrow:
- Fulcrum: Wheel
- Load: Materials carried in the tray
- Effort: Force applied to the handles
2. In a seesaw:
- Fulcrum: Centre support
- Load: One child
- Effort: The other child pushing down
IMPORTANCE OF THE PARTS OF A LEVER
1. They help the lever work effectively.
2. They make lifting and moving heavy objects easier.
3. They reduce the amount of effort needed to do work.
Points to Note: Every lever has three main parts:
- Fulcrum – the fixed point.
- Load – the object being moved.
- Effort – the force used to move the load.
These three parts work together to make lifting, pushing, or moving objects easier.
USES OF LEVERS IN EVERYDAY LIFE
Levers are used in many daily activities because they make work easier by reducing the effort needed to lift, move, or cut objects.
1. Lifting heavy objects using a crowbar or wheelbarrow.
2. Cutting materials with scissors.
3. Opening bottle caps with a bottle opener.
4. Cracking nuts with a nutcracker.
5. Pulling out nails with the claw of a hammer.
6. Sweeping the floor with a broom.
7. Holding and gripping objects with pliers.
8. Picking up small objects with tweezers.
9. Fishing with a fishing rod.
10. Playing on a seesaw at the playground.
IMPORTANCE OF LEVERS
1. They make work easier.
2. They reduce the effort needed to do work.
3. They help save time and energy.
4. They improve efficiency in homes, schools, farms, and industries.
5. They help people lift, cut, grip, and move objects safely.
SIMPLE PRACTICAL ACTIVITIES ON MAKING A LEVER
ACTIVITY 1: Making a Simple First-Class Lever
Materials Needed:
1. A ruler or wooden strip
2. A pencil or bottle cap (to serve as the fulcrum)
3. Small stone or eraser (load)
Procedure:
1. Place the pencil or bottle cap on a flat table.
2. Put the ruler across the pencil.
3. Place the stone on one end of the ruler.
4. Press down the other end of the ruler.
Observation:
- The stone is lifted with less effort.
- The pencil acts as the fulcrum.
ACTIVITY 2: Making a Simple Second-Class Lever
Materials Needed:
1. A ruler or wooden strip
2. Bottle cap (fulcrum)
3. Small object (load)
Procedure:
1. Place the bottle cap at one end of the ruler.
2. Put the load in the middle of the ruler.
3. Lift the other end of the ruler.
Observation:
- The load is lifted easily.
- The load is between the fulcrum and the effort.
ACTIVITY 3: Demonstrating a Third-Class Lever
Materials Needed:
Broom
Procedure:
1. Hold the top end of the broom with one hand.
2. Place the other hand in the middle of the broom.
3. Sweep the floor.
Observation:
- Your upper hand acts as the fulcrum.
- Your middle hand provides the effort.
- The broom head moves the dirt and acts on the load.
Safety Precautions
1. Handle the materials carefully.
2. Do not use sharp or heavy objects.
3. Work under the teacher’s supervision.
4. Keep the work area clean and orderly.
5. Return all materials after the activity.
Conclusion – The activities show that a lever is a simple machine that helps us lift or move objects with less effort. Every lever has three parts: the fulcrum, load, and effort. Different types of levers make different kinds of work easier.
WEEKLY ASSESSMENT: TEST QUESTIONS AND ANSWERS/ASSIGNMENT
A. Multiple Choice Questions
1. A simple machine is a tool that ______.
A. makes work easier
B. makes work harder
C. creates electricity
D. produces food
2. Which of the following is a simple machine?
A. Television
B. Lever
C. Computer
D. Radio
3. A lever is a rigid bar that moves on a fixed point called the ______.
A. effort
B. load
C. fulcrum
D. axle
4. In a first-class lever, the ______ is between the effort and the load.
A. wheel
B. handle
C. rope
D. fulcrum
5. Which of the following is an example of a second-class lever?
A. Scissors
B. Wheelbarrow
C. Broom
D. Tweezers
B. Fill in the Blanks
6. A ______ is a simple machine that helps to lift or move objects.
7. The three parts of a lever are ______, ______, and ______.
8. The fixed point of a lever is called the ______.
9. In a third-class lever, the ______ is between the fulcrum and the load.
10. A bottle opener is an example of a ______-class lever.
C. True or False
11. A lever is a type of simple machine. ______
12. The fulcrum is the fixed point of a lever. ______
13. A broom is an example of a third-class lever. ______
14. Levers make work more difficult. ______
15. Scissors are examples of first-class levers. ______
D. Short Answer Questions
16. What is a simple machine?
17. What is a lever?
18. Mention the three types of levers.
19. Name the three parts of a lever.
20. State five uses of levers in everyday life.
ANSWER KEYS
1. A – Makes work easier
2. B – Lever
3. C – Fulcrum
4. D – Fulcrum
5. B – Wheelbarrow
6. Lever
7. Fulcrum, Load, Effort
8. Fulcrum
9. Effort
10. Second
11. True
12. True
13. True
14. False
15. True
16. A simple machine is a basic tool that makes work easier by reducing the effort needed to perform a task.
17. A lever is a simple machine made up of a rigid bar that moves on a fixed point called the fulcrum.
18. The three types of levers are:
- First-class lever
- Second-class lever
- Third-class lever
19. The three parts of a lever are:
- Fulcrum
- Load
- Effort
20. Any five:
- Lifting heavy objects
- Cutting materials with scissors
- Opening bottle caps
- Cracking nuts
- Pulling out nails with a hammer
- Sweeping with a broom
- Holding objects with pliers
- Picking up small objects with tweezers
- Fishing with a fishing rod
SUMMARY
In this lesson, pupils learned that a simple machine is a basic tool that makes work easier by reducing the effort needed to perform a task. They identified the six simple machines: lever, wheel and axle, pulley, inclined plane, wedge, and screw.
Pupils also learned that a lever is a simple machine made up of a rigid bar that moves on a fixed point called the fulcrum. They studied the three types of levers:
- First-class lever – the fulcrum is between the effort and the load.
- Second-class lever – the load is between the fulcrum and the effort.
- Third-class lever – the effort is between the fulcrum and the load.
They identified the three main parts of a lever as the fulcrum, load, and effort and learned that these parts work together to make lifting and moving objects easier.
Finally, pupils learned the uses of levers in everyday life, such as lifting heavy objects, cutting materials, opening bottle caps, cracking nuts, pulling out nails, sweeping, gripping objects, and fishing. Levers help save time and energy and make work easier.
PRESENTATION
To deliver the lesson, the teacher adopts the following steps:
1. The teacher displays real objects and pictures of simple machines such as a wheelbarrow, scissors, bottle opener, crowbar, broom, and hammer.
Pupils’ Activities: Pupils observe the objects and identify those they have used before.
2. The teacher explains the meaning of simple machines and gives examples.
Pupils’ Activities: Pupils define simple machines and mention examples found at home and in school.
3. The teacher explains the meaning of a lever and the three types of levers using charts and real objects.
Pupils’ Activities: Pupils identify the three types of levers and give examples of each.
4. The teacher points out the three parts of a lever (fulcrum, load, and effort) using a simple demonstration.
Pupils’ Activities: Pupils identify the fulcrum, load, and effort on the demonstrated lever.
5. The teacher explains the uses of levers in everyday life.
Pupils’ Activities: Pupils mention different uses of levers and identify tools that work as levers.
6. The teacher asks oral questions based on the lesson.
Pupils’ Activities: Pupils answer the questions and participate actively in the discussion.
7. The teacher summarizes the lesson.
Pupils’ Activities: Pupils participate in the summary and write the important points in their notebooks.
8. The teacher gives classwork, marks pupils’ responses, and provides corrections where necessary.
Pupils’ Activities: Pupils complete the exercise and correct their mistakes.
CONCLUSION
To conclude the lesson for the week, the teacher revises the entire lesson and links it to the following week’s lesson.
NEXT LESSON
LESSON EVALUATION
Teacher asks pupils,
1. What is a simple machine?
2. Mention the six basic simple machines.
3. What is a lever?
4. State the three types of levers.
5. Name the three main parts of a lever.
6. Give two examples of each type of lever.
7. State five uses of levers in everyday life.
8. Explain how a lever makes work easier.

Meaning and Types of Physical Violence | Ways of Preventing Physical Violence Kindergarten (Age 5) Term 3 Week 4 Social Habits

Meaning and Uses of Satellite | The Launching of Nigeria SAT – 1 | Primary Objectives of the Nigeria SAT 1

Chemistry Guides for SS 3 Chemistry and Industries – Ethical, Legal and Social Issues, Iron, Mental and their Compound and Petroleum or Crude Oil
About The Author

Alabi M. S.
Michael is a Principal Education Officer at LASUBEB with over 15 years of experience in teaching and learning. He is passionate about developing plan lesson notes and promoting quality assurance in education. Michael strongly believes that teachers inspire the future and play a vital role in shaping the next generation.